How to Import Office 365 Contacts to Android Phone? Different Techniques
Are you using the Microsoft 365 platform and want to import Office 365 contacts to Android phone? If so, you’ve come to the right place. This article provides step-by-step instructions on how to sync Office 365 contacts with Android. After the conversion, you can easily use your Office 365 contacts on your Android phone.
Nowadays, the mobile phone has become an integral part of everyone’s life. Most of the users prefer to use the Android phone due to its user-friendly interface and unique feature. Furthermore, contact has become more significant for every user as they are responsible for the communication process. Alternatively, MS Office 365 is a cloud-based email application and it provides various advanced services.
It involves Exchange Online for email, SharePoint Online for collaboration, Lync Online for unified communications, etc. Therefore, users need to import their contacts from Office 365 to an Android smartphone. Here we are going to discuss different techniques to transfer contacts from Office 365 to android in an absolute way.
Table of Content
Approach 1: Import Office 365 Contacts to Android Phone
Users can follow these steps to sync Office 365 contacts with Android smartphones. Let us have a look:
- First, go to Settings option in your Android phone
- In Settings, you can see multiple options but you have to select Accounts & Sync option
- From the Account & Sync option, click on Add account
- Next, choose Corporate, Microsoft Exchange or Exchange option
- Now, Enter the Office 365 email address and password. Also, you can set this email as default account when sending mail from this device and press Next button
- Depending upon the smartphone and configuration for DNS records, your Android phone may be automatically configured. If it is not simply configured, then you have to fill the below information:
- Domain\Username
- Password
- Server
Remember: In some Android phones, the username and domain fields are separate. In that case, users should leave that domain field blank
- Make sure you should use a secure connection (SSL) and accept the SSL certificates checkbox get selected. After finishing the Account Setup, click Select >> Next
- After that, your device will verify server settings online
- Then, you would be asked to accept the IT policy for an organization. Further, you have to accept the policy by clicking OK button
- You must have to select the required syncing options and press Next
- Enter the name of a particular account and tap Next
- Select Activate option to activate the account. Once your account has been activated, all contacts will start to download to device and you can sync Office 365 contacts with android phone successfully.
Approach 2: Sync Outlook Contacts with Android via the Mobile App
Unlike Google, which has made Contacts a separate app, Microsoft keeps its contacts (or people, as they call them) within a sub-section of its mailing service, Outlook.
So, you don’t need to import Office 365 contacts to Android phone but sync them. However, the problem is that this feature is disabled by default. Considering they are both from completely different companies, this is not surprising. Needless to say, you won’t have to go anywhere else, as here are all the instructions in an easy manner:
- Open the Outlook App on your phone.
- Tap on the home icon at the top left corner.
- On the pane, tap on the gear icon. You will find it on the bottom left.
- Choose the account whose contacts you are looking to sync.
- Toggle the “Sync contacts” option.
- If you have not permitted Outlook to access your contacts, a pop-up appears.
- Click on Allow.
This will automatically sync Outlook contacts with Android in the background.
Note that this is a 2-way sync. This means all your Android contacts will also start to appear in Outlook and, therefore, in your Microsoft 365 account.
If you don’t want this to happen, then we suggest you take an alternative route that bypasses syncing.
Automated Way to Import Office 365 Contacts to Android
The export-import method is still the most reliable. The solution is divided into four simple steps, as explained below.
- First, export contacts out of Office 365.
- Change those contacts in vCard.
- Send the vCard to your Android.
- Add that VCF data to the contacts app.
So let’s start with the first step.
Step 1: Transfer Office 365 Contacts Out of Outlook
- Log in to your Office 365 Account (Now renamed to Microsoft 365)
- Click on the Apps icon present on the left pane
- Scroll until you see the People option, then click on it.
Note that you may be asked to sign in again. Follow the protocol and continue. - On the People page, click Manage contacts and select Export contacts from the dropdown.
- In the Export contacts window, pick a contact folder or continue with All contacts & hit Export.
- Choose a folder to place this CSV data in and press Save.
We hit a roadblock here, as Android’s built-in Contacts app doesn’t directly support importing contacts from a CSV file on your device. Before you begin the laborious manual entry, wait, as there is a way out of this situation.
Android phones can still add all these contacts from Outlook to an Android phone/tablet. However, there is a catch: you must first change their file type from CSV to vCard. Don’t worry, as we have an automated utility ready to assist you.
Step 2: Convert Exported Files to vCard
As soon as your CSV file is saved on your local machine, you must use FreeViewer Software to convert this file to vCard format to import Office 365 contacts.
There is an option provided by the tool to create a VCF file for each contact with an empty email address. You can create an Excel spreadsheet to meet your needs with a variety of naming options. Let’s see how to convert the file to the required format.
Instructions on How to Import Office 365 Contacts to Android Phone
- Download the Software to your Windows computer and click the Browse button to select your contact file

- Preview a CSV file with all your contacts

- Match the Excel fields with the vCard fields and click the Next button

- Select your vCard version and check the Import blank email address box. Press Export button.

Step 3: Send VCF Contacts to Android Phone
Some easy methods with which you can do a desktop-to-handheld device transfer are.
- Email a copy of the file to yourself
- Send the file via a messaging app (WhatsApp, Telegram) to any contact temporarily.
- Add it to a cloud storage solution and sync it between devices.
- Use a USB cable to transfer data.
- Create a Custom FTP request between devices via a remote server.
In some Android phones, it might be possible to directly trigger the import contacts screen by tapping on the VCF file from any source. Open your mobile and go directly to the location where you sent the vCard data.
Step 4: Import VCF Contacts to Android Phone
After the transfer of VCF data to the Android phone. Users can add this vCard file to their smartphone contacts by following the below steps:
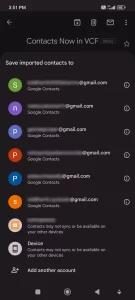
- Tap on the VCF file wherever it is on your device. In our case, we sent it over mail.

- This opens an account selection screen. Choose a contact to place the VCF data.

- If successful, you will be notified via a message at the bottom of your screen.
- After a short span (depending on the number of contacts), open the Contacts app on your Android device.
- There, you will find all the new contacts that you brought from Office 365.
Bottom Line
At a certain time, almost everyone feels the need to import Office 365 Contacts to Android phone due to some reason or another. However, many are unable to find a reliable and efficient solution to move Office 365 contacts. Thus, in this blog, we have discussed multiple techniques to sync Outlook contacts with Android device. Make sure you should follow each step very carefully. If you need to transfer Excel contacts to iPhone directly then you can use this same software.


