How to Forward Emails to Multiple Accounts Office 365 – Learn Step By Step


As an Office 365 admin, you might encounter situations where you need to forward emails to multiple accounts. Email forwarding allows you to forward emails sent to a user’s inbox to another user’s mailbox inside or outside of the organization.
To address this query, I have created a step-by-step procedure for performing this entire task easily. I have also described a trustworthy alternative that you can use to carry out this task more efficiently.
Table of Content
Before getting into the solution, let’s briefly overview the user query.
User Query
“Hi, there! I have a bunch of emails that I urgently want to forward to a different Outlook account. And, I have no idea how to do it without causing any errors. So, I was wondering, can Office 365 forward email to multiple users? If there is any simple method available then please let me know. I would really appreciate it. Thanks.”
We’ve come across various similar types of user queries on the internet. You know, emails play a crucial part at an individual as well as a business level. So, whatever method you follow to forward email to multiple addresses Office 365 admin, you should be careful while doing the same. Otherwise, you might lose sensitive information due to minor errors.
If you wish to forward your emails manually, then here is the method that Microsoft supports.
Also Read: How to Migrate Shared Mailbox to Office 365 User Mailbox?
Different Manual Methods to Forward Emails from One Account to Another
- In Classic Outlook
- In New Outlook / In Web
Before You Configure Email Forwarding
To set the email forwarding you must not these points –
- You should have an Exchange Admin privilege to configure it.
- Once you set up the email forwarding it will only forward the new emails received in the primary mailbox.
- You need to ensure that the user account where you set up email forwarding has a valid license assigned to it.
Steps to Forward Emails from One Account to Another in Classic Outlook
Below is the step-by-step procedure that the tech giant supports for forwarding emails.
Step 1. Enter the login credentials for the source user account.
Step 2. Open Outlook and go to Home.
Step 3. Browse in the Rules section and select Manage Rules then choose Alerts.
Step 4. Next, click on New Rule >> choose to Apply rule on the message I receive located near the bottom of the list.
Step 5. Then click on the Next button.
Step 6. After that, select the Yes option when Windows appears asking “This rule will be applied to every message you receive”.
Step 7. Now, select the actions to redirect the messages to persons or a public group and hold the procedure of processing more rules from the next list.
Step 8. Next, click the underlined phrase people or public group in the bottom part of the window.
Step 9. Finally, enter the Email ID to forward mail to the To field, then click OK>> Finish.
Steps to Forward Emails to Multiple Addresses Office 365 in New Outlook / Outlook Web
- Step 1. At the top of the page, click on Settings by clicking on the gear icon.
- Step 2. Choose Mail > Forwarding.
- Step 3. Choose Enable Forwarding, enter the forwarding email address, and click on the Save.
Note: If you want a copy of the original message to remain in your mailbox, select Keep a copy of forwarded messages.
Forward Emails to Multiple Accounts in Office 365 Via Admin Center
- Step 1. Login to the admin center with admin credentials. Navigate to the Users and click on Active Users.
- Step 2. Click on the user account from which you want to forward emails, and click on the Mail tab.
- Step 3. Click on Manage Email Forwarding.
- Step 4. Now on the email forwarding page, click on Forward all emails sent to this mailbox. Enter the email address of the account where you want to get these emails. Click on the save changes option.
Note: Make sure not to delete the account where you configured email forwarding, else it will stop forwarding emails.
The above procedure may feel like it’s enough. However, it’s not.
Why so?
Well, it might be feasible to forward a few emails. Besides, using the manual approach, you can’t forward old emails present in the source user’s mailbox. So, you can forward only upcoming emails by setting up email forwarding in Outlook. And in to keep the email forwarding in place you have to assign a license to that user account. Furthermore, the emails that you forward get merged at the destination and it becomes difficult to manage and find the emails.
So, What Can You Do Instead Of Forwarding Emails to Multiple Accounts in Office 365?
Well, the best thing you can do to avoid all the complexity of email forwarding is to migrate your emails from one account to another. It solves the problem of manually forwarding emails as well as ensures complete data protection and integrity at the destination account.
Moreover, using this approach you can also transfer old mailbox databases without any hassle., and there is no need to keep that account active. Once the migration is completed you can delete that user account if required.
Best Alternative for Office 365 Forward Email to Multiple Users
For data transfer in Office 365, I suggest the Most Trusted Office 365 to Office 365 Migration Tool. It is used by many IT experts and Office 365 administrators around the world for its ease of use and user-friendly interface.
Above all, instead of forwarding emails to multiple accounts in Office 365, if you migrate your emails then you will have various other options that you can do with the software. Such as;
- Along with emails, you can also migrate contacts, calendars, and tasks.
- Further, you can filter out the elements that you want to migrate by applying a Date Filter.
- Additionally, you can migrate multiple emails at once using the software.
- The advanced feature of the tool lets you perform an account-based priority migration.
- It allows you to execute a Re-run migration for the items that were missing during the initial run.
- On a technical note, domain migration can be possible in different domains as well as in the same domain.
These are just a handful of features. There is more to it.
Now, let’s understand the procedure for effectively migrating your Office 365 content.
Steps to Forward Old Email to Multiple Users in Office 365
Below is the straightforward working procedure of the tool with screenshots.
Step 1. Install the tool from the given link and launch it on your system.
Step 2. Next, in the ‘Setup’ section, choose Office 365 as both the source and destination to forward emails from one account to another Outlook.
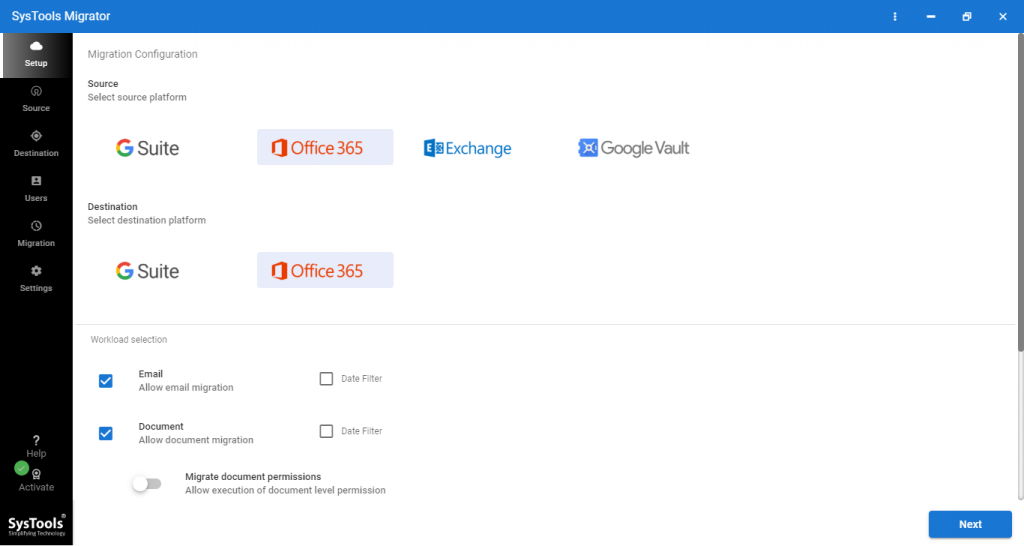
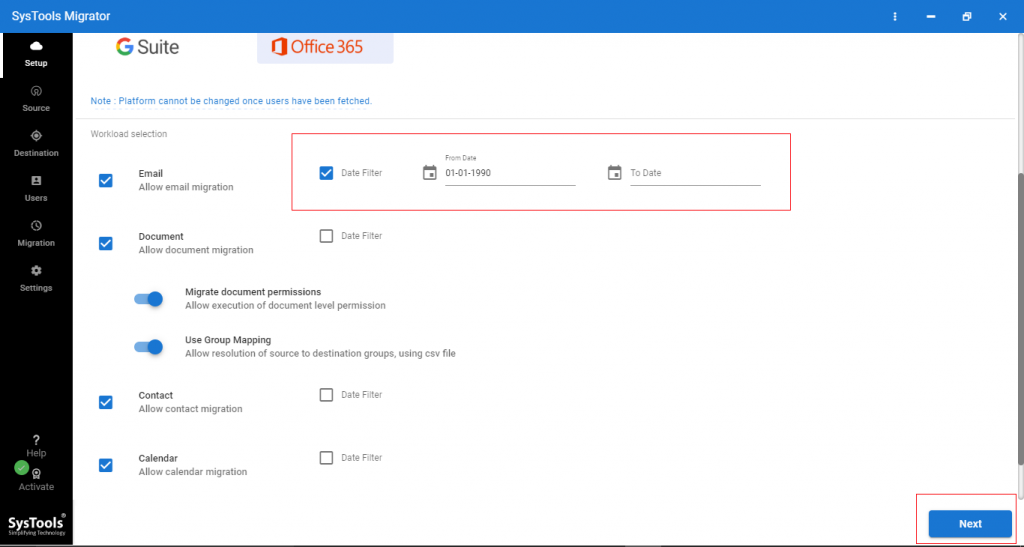
Step 3. After that, scroll down, and click on the Email checkbox. (You may also tick the contacts, calendars and tasks checkboxes)
Note: You can apply the ‘Date Filter’ and migrate only the selected items.
Step 4. Then, go to the Source section, and enter Office 365 admin ID and application ID for the source. Next, click on the Validate button and authenticate the required permissions.
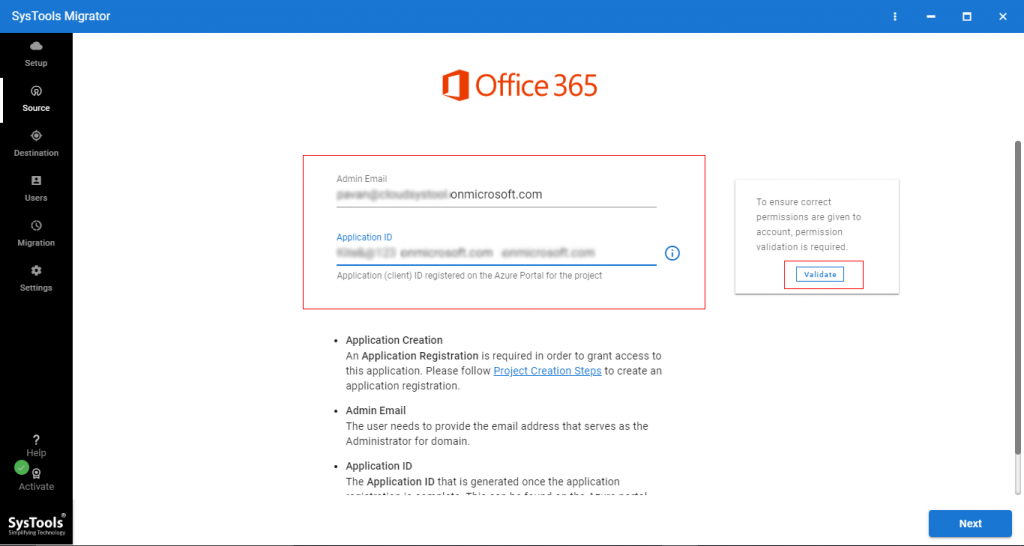
Step 5. Once you see that all the necessary fields turn green, you can press the Next button.

Step 6. After that, move toward the ‘Destination’ tab. Provide the Office 365 admin ID and Application ID for the destination then click on the Validate button.
Step 7. Once you verify the necessary permission, click on the ‘Next’ button to proceed further.
Step 8. Next, map the source users with the destination by specifying the source users from any of the three options: fetch users, import users, and download the template.
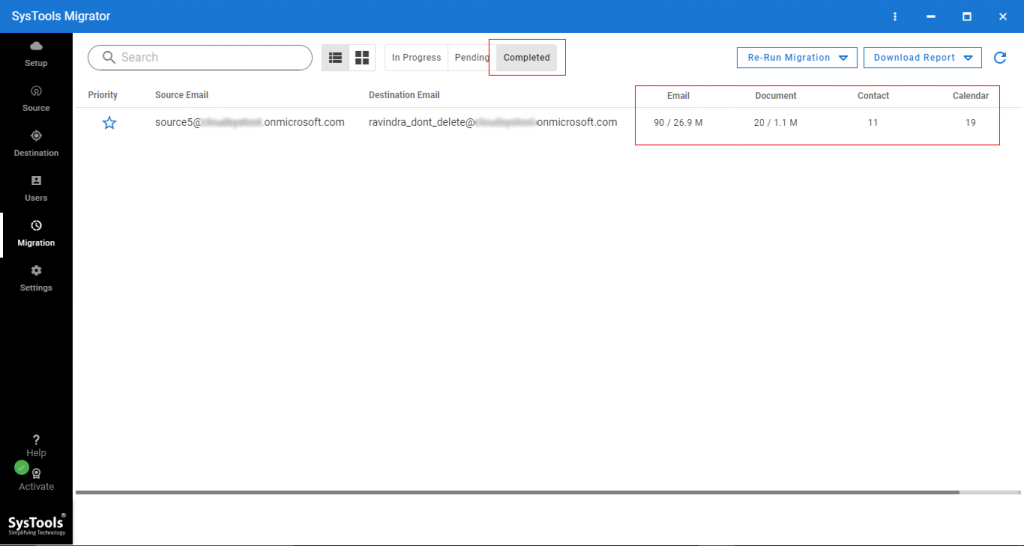
Step 9. Then, both the source and destination users appear on your screen like this.
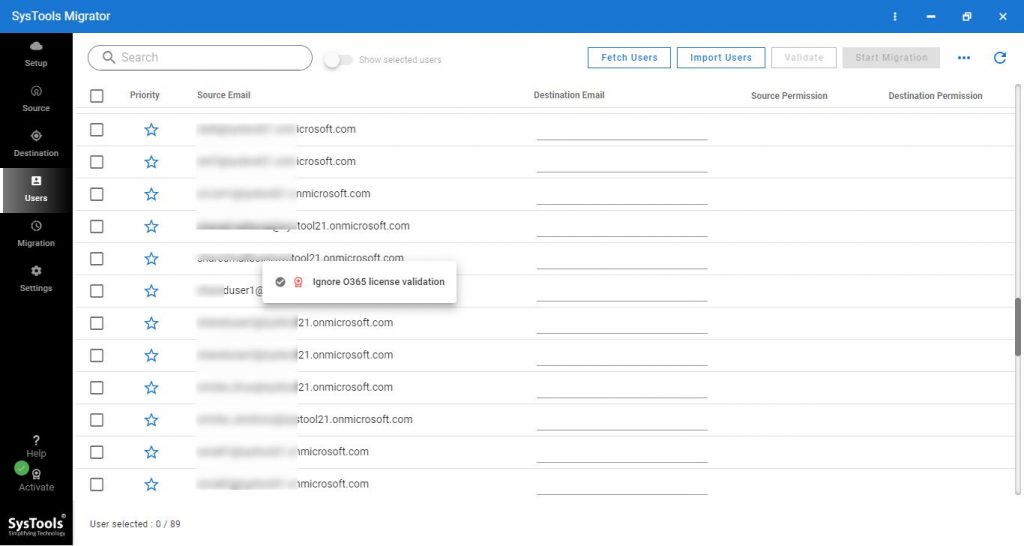
Step 10. After that, run a final verification of the source and destination permissions by clicking on the Validate button.
Step 11. After all the necessary permissions turn green for source and destination, press the Start Migration button to forward emails to multiple accounts in Office 365.
Also Read: How to Export Office 365 Mailbox to PST using eDiscovery?
Bringing It All Together
In the end, you can say that whether you have a few emails or a large number of emails to forward, setting up email forwarding is not going to help as it will only forward the upcoming emails. So, migrating emails from one account to another Outlook is the best alternative solution to forward emails to multiple accounts in Office 365.
Hence in this write-up, I have described reliable software that helps you to move or forward old as well as new emails to multiple user accounts without any hassle or downtime. You can use any of the above methods as per your requirements.
FAQs
Q1. Can you forward emails to multiple email addresses in Office 365 for existing data?
No, you cannot forward existing emails to targeted users manually. However, by opting for the software mentioned above, you can follow a five-step alternative to forward emails to multiple Office 365 accounts, preserving existing email data from the source account.
- Step 1. Download, Install, and Launch Software.
- Step 2. Choose Office 365 as the Source and Destination.
- Step 3. Select Required Workload and Apply Filter.
- Step 4. Use Admin Credentials to log in and Validate.
- Step 5. Select Users and Click on Start Migration.
Q2. How do I mass forward emails in Outlook 365?
To mass forward emails in Outlook 365 and combine them into a single message, follow the below steps:
- Step 1. Select the emails you want to forward and press Ctrl while clicking each one.
- Step 2. Go to the Home menu and click “Forward” or press Ctrl + F. This will open a new email with the selected emails attached.
- Step 3. Enter the recipient’s email address, add a subject and any additional message content you want, and then click “Send” to forward the combined emails.